Lumen Camera App User Manual
1. Welcome
Lumen Camera is a full-featured iPhone camera app built around a Liquid Glass interface, fast capture controls, professional manual tools, private gallery storage, and dedicated modes for Photo, Portrait, Video, and Cinematic Video.
This manual covers the app as it exists today: first-run setup, every capture mode, manual controls, video settings,
photo formats, filters, gallery tools, privacy features, subscriptions, support, and global preferences.

2. First Run, Permissions, And Quick Start
2.1 First-Run Onboarding
The first time you open Lumen Camera, the app shows the onboarding flow before opening the camera. After onboarding is completed, the app opens directly to the camera on future launches.
Onboarding introduces the core experience and prepares the app for camera use.
2.2 Required Permissions
Lumen Camera asks for iOS permissions only when needed:
Camera: Required for all photo, portrait, video, and cinematic capture.
Microphone: Required for video recording and audio-backed capture workflows.
Photos Library: Required when viewing, importing, managing, or saving to the iOS Photos library.
Add Photos Only: Used when saving captures directly to Photos.
Motion: Used for the level indicator and orientation-aware camera UI.
Face ID / Touch ID / Optic ID: Used only if you enable Gallery Lock biometrics.
2.3 Quick Start Guide
After onboarding, Lumen Camera presents a full-screen Quick Start Guide over the camera. The guide is also available later from Settings -> Quick Start Guide.
The Quick Start Guide uses swipeable slides with screenshots and short explanations. It introduces the Liquid Glass UI, capture modes, manual controls, filters, gallery, and privacy features.
3. Main Camera Interface
3.1 Viewfinder
The viewfinder is the live camera preview. Most capture controls float above it so you can keep the subject visible while adjusting settings.
The interface adapts between Photo/Portrait and Video/Cinematic layouts. Photo and Portrait use a photo-oriented preview area, while Video and Cinematic expand to a video-oriented preview.
3.2 Capture Mode Selector
Use the main mode selector to switch between:
Photo: Standard still-photo capture with Auto, Semi-Manual, and Manual exposure controls.
Portrait: Depth-aware still-photo capture with adjustable blur.
Video: Standard video recording with resolution, frame rate, codec, stabilization, audio, and color profile controls.
Cinematic: Video recording with Apple's Cinematic Video focus tracking and adjustable blur.

3.3 Shutter Button
The shutter button changes behavior by mode:
Photo: Captures a still photo.
Portrait: Captures a portrait photo and may show a processing indicator while depth processing finishes.
Video: Starts or stops recording.
Cinematic: Starts or stops cinematic recording.
If a timer is active in still-photo modes, pressing the shutter starts the countdown instead of capturing immediately. Pressing again during countdown cancels it.
3.4 Gallery Button
The gallery button opens Lumen Camera's built-in gallery. During video recording, the gallery button area is used for video pause/resume controls.
3.5 Settings / Liquid Glass Menu
The top menu opens a Liquid Glass control sheet. This sheet changes depending on whether you are in photo-style modes or video-style modes.
Common controls include Flash, Timer, Grid, Gallery, Settings, and Level. Photo controls include Format, Aspect Ratio, and Save Destination. Video controls include Resolution, Frame Rate, Color, Audio, Stabilization, and Codec.
4. Universal Capture Controls
4.1 Switching Cameras
Use the camera switch button to move between front and rear cameras. The app handles mode-specific transitions and reconfigures the session for the new camera.
Some features are only available on the rear camera or on supported devices. If a selected mode or feature is unavailable after switching cameras, Lumen Camera falls back to a compatible mode or setting and shows a toast message.
4.2 Zoom Pills
Zoom pills provide fast jumps between common focal lengths such as ultra-wide, wide, telephoto, and extended zoom levels where available.
The exact zoom pills depend on your iPhone's camera hardware. Multi-camera iPhones can switch between physical lenses and virtual-device zoom ranges.
4.3 Zoom Rail
Pinch the viewfinder or long-press a zoom pill to open the continuous zoom rail. The zoom rail supports fine adjustments and uses magnetic detents around key zoom values.
In Semi-Manual and Manual modes, crossing a physical lens boundary can trigger a camera device switch. If a manual setting is no longer compatible with the new lens, the app resets that setting to Auto and shows a toast.
4.4 Tap To Focus And Exposure
In Photo and Video style modes, tap the viewfinder to focus and meter on the subject. A focus reticle appears where you tapped.
In Auto Photo mode, you can adjust exposure compensation after focusing by dragging vertically on the exposure control. This changes EV without entering Manual mode.
4.5 AE/AF Lock
Long-press the viewfinder to lock focus and exposure where supported. The AE/AF lock label appears while the lock is active.
Use AE/AF Lock when you want consistent exposure or focus while recomposing.
4.6 Flash
Flash supports three modes:
Off: Flash does not fire.
Auto: The app lets the camera decide when flash is needed.
On: Flash is requested for supported still-photo captures.
Tap Flash to cycle modes. Long-press Flash or use the Liquid Glass menu to choose a specific mode.
In Video mode, flash/torch behavior is applied for recording when supported by the current camera.
4.7 Timer
The still-photo timer supports:
Off
3 seconds
5 seconds
10 seconds
30 seconds
Tap Timer to cycle, or long-press it to choose a duration directly. When active, the timer displays a badge and the viewfinder shows a countdown after you press the shutter.
4.8 Grid
The grid helps with composition and alignment. Available grid states include:
Off
3x3
4x4
Use the Grid button or the Liquid Glass menu to cycle or choose the grid type.
4.9 Level
The level indicator uses device motion to help you keep the horizon straight. Toggle it from the Liquid Glass menu.
4.10 Macro
On supported rear-camera devices, Lumen Camera supports Apple-style macro behavior. Macro is enabled by default and allows the system to switch to the ultra-wide camera for close subjects.
When the app detects close-focus conditions, it can show a macro hint button. You can use it to control whether auto-macro switching is allowed.
Macro is disabled in modes where it conflicts with the capture pipeline, including Portrait, Cinematic, and Semi/Manual physical-camera workflows.
4.11 Volume Button Shutter
When enabled in Settings, the physical volume buttons can trigger capture. In Photo and Portrait they act like the shutter. In Video and Cinematic they follow the active recording behavior where supported by the current mode.
4.12 Haptics And Toasts
Lumen Camera uses haptics for mode changes, control adjustments, capture feedback, warnings, and successful actions. Toast messages provide short status updates and guardrail warnings.
You can turn haptics and non-critical toast messages on or off in Settings. Critical warnings and permission errors may still appear when needed.
5. Photo Mode
Photo mode is the primary still-camera mode. It supports Auto, Semi-Manual, and Manual exposure workflows; photo formats; aspect ratios; filters; save destinations; macro; flash; timer; grid; level; focus/exposure overlays, and gallery integration.
5.1 Auto Photo
Auto Photo is the default point-and-shoot experience. The camera handles exposure, ISO, shutter, focus, and white balance automatically.
Use Auto Photo when you want the fastest capture path:
Tap to focus and meter.
Drag exposure compensation when available.
Use zoom pills or the zoom rail for lens changes.
Use flash, timer, grid, level, filters, macro, aspect ratio, histogram, and zebras as needed.
5.2 Semi-Manual Photo
Semi-Manual mode is a linked exposure mode. You control either ISO or shutter speed, and Lumen Camera calculates the other value to preserve the exposure baseline.
Use Semi-Manual when you want creative control without fully balancing exposure yourself:
Lock ISO to control noise level; the app calculates shutter speed.
Lock Shutter to freeze motion or allow motion blur; the app calculates ISO.
Use EV compensation to intentionally brighten or darken the linked exposure target.
If the calculated value reaches hardware limits, the app shows a warning toast.
5.3 Manual Photo
Manual mode gives independent control over supported camera parameters:
ISO: Controls sensor gain and image noise.
Shutter: Controls exposure time and motion blur.
Focus: Locks lens position for manual focusing.
White Balance: Locks color temperature using presets or Kelvin.
Zoom: Opens the zoom rail from the manual tools.
Tools: Opens histogram, Focus Peaking, Focus Loupe, and Zebras controls.
Manual mode uses an exposure meter to show how far your manual settings are from the current auto-exposure baseline.


5.4 Photo Aspect Ratios
Photo mode supports these aspect ratios:
4:3: Native camera aspect.
1:1: Square.
16:9: Wide frame.
4:5: Portrait-oriented social crop.
Tap the aspect ratio control to cycle through ratios. Long-press it or open the Liquid Glass menu for direct selection. The app applies a crop mask in the viewfinder and crops the captured image after capture while preserving metadata where possible.
Aspect ratio can be remembered separately for front and rear cameras.
5.5 Photo Capture Processing
After capture, Lumen Camera may process the image depending on your selected format, filter, auto-enhance setting, and aspect ratio. Some captures complete instantly; others may show a processing indicator or toast.
Examples:
Standard HEIF captures can be auto-enhanced if Auto Enhance is enabled.
Lumen Enhanced captures use the Lumen processing pipeline.
Filtered captures apply the selected creative filter.
Non-4:3 aspect ratios are cropped after capture for non-RAW formats.
6. Portrait Mode
Portrait mode captures depth-aware still photos with adjustable background blur. It uses the camera's depth capabilities and Lumen Camera's portrait processing pipeline.
6.1 Entering Portrait Mode
Select Portrait from the mode selector. Lumen Camera configures the camera for depth capture and disables incompatible controls while Portrait is active.
If the current camera or format cannot support Portrait, the app shows a warning and returns to a compatible mode.
6.2 Portrait Blur
Portrait mode adds a blur control to the orbital hub. Use it to adjust blur intensity before capture.
The live blur preview is an estimate. The final captured portrait uses the high-quality capture pipeline and may look more accurate than the preview.
6.3 Depth Overlay
When supported by the active Portrait configuration, Portrait mode can show a creative depth-map overlay. The overlay visualizes depth as a heat-map style preview so you can see how the camera interprets near and far areas.
Use this when you want to understand whether the subject and background are being separated clearly.
6.4 Portrait Guardrails
Portrait mode can warn when the scene is difficult for depth capture. You may see guidance when:
The subject is too close.
The subject is too far.
The scene is too flat for reliable separation.
The scene is too dark.
Depth data is unavailable.
Follow the toast guidance, adjust distance or lighting, and try again.
6.5 Portrait Capture
Press the shutter to capture a portrait photo. Lumen Camera captures the image and depth information, then renders the final blur result. The shutter may show a processing indicator while the final portrait is prepared.
6.6 Portrait Limitations
Portrait mode has stricter requirements than Photo mode:
RAW formats are not used for Portrait capture; the app falls back to a compatible standard format when necessary.
Macro is disabled because auto-macro switching conflicts with depth capture.
Semi-Manual and Manual exposure controls are disabled in Portrait mode.
Some depth features depend on device hardware, camera position, lighting, and subject distance.
7. Video Mode
Video mode records standard video with professional settings for resolution, frame rate, codec, bitrate, stabilization, audio, and color profile.
7.1 Starting And Stopping Recording
Select Video from the mode selector. Press the shutter to start recording. Press it again to stop.
While recording, Lumen Camera shows:
A recording timer.
A red recording indicator.
Recording state changes.
Audio level updates in the manual/status UI where available.
Pause/resume control in Video mode.
7.2 Pause And Resume
In standard Video mode, a pause/resume control appears during recording. Tap pause to pause recording, then tap play to resume. The HUD shows a paused state while recording is paused.
Cinematic mode uses a different recording pipeline and does not expose the standard Video pause button.
7.3 Video Resolution
Video resolution can be changed from Settings -> Video Format or the Video Liquid Glass menu.
Supported options are device-dependent and include:
720p HD
1080p HD
4K UHD
If the selected resolution is unavailable on the current device or camera, Lumen Camera falls back to the best available compatible setting.
7.4 Frame Rate
Frame rate controls motion cadence and slow-motion capability. Device-dependent options include:
24 fps
25 fps
30 fps
60 fps
120 fps
240 fps
Not every frame rate is available at every resolution. If a selected frame rate is incompatible with the current resolution, the app selects a compatible fallback.
7.5 Codec
Video codec controls compression format:
H.264: Broad compatibility.
HEVC (H.265): More efficient compression and required for some advanced color workflows.
HDR and Apple Log require HEVC. If a 10-bit color mode is active, H.264 may be unavailable or coerced to HEVC.
7.6 Bitrate
Bitrate controls video data rate and file size:
Auto: App-selected bitrate.
Low: Smaller files.
Medium: Balanced size and quality.
High: Higher quality and larger files.
Bitrate scales with resolution and frame rate so higher frame rates receive more data.
7.7 Stabilization
Video stabilization options include:
Auto: Default stabilized behavior.
Off: Full field of view with no electronic stabilization.
Standard: Moderate stabilization.
Cinematic: Smoother stabilization where supported.
Cinematic Extended: Stronger stabilization where supported.
Some stabilization modes are unavailable on some devices or with Apple Log. When Apple Log is active, stabilization is limited to supported modes such as Off and Standard.
Lumen Camera can temporarily disable stabilization when low-latency tools are active, including creative filters, focus peaking, or focus loupe, to keep preview and recording responsive.
7.8 Color Profile
Video color profile options include:
Standard: Standard dynamic range video.
HDR (Dolby Vision): High dynamic range video where supported.
Apple Log: Flat professional color profile for grading on supported devices.
HDR and Apple Log availability depends on device hardware, camera, format, and current settings.
7.9 Audio Source
Video recording uses the microphone and supports audio routing through the iOS audio session. Lumen Camera can retain a preferred audio input when one is selected and reapply it across recording configuration and route changes.
Use the Audio control in the Video Liquid Glass menu to choose or inspect available audio input behavior where supported.
7.10 Video Framing
Video and Cinematic use a video-style preview layout and are framed for 16:9 recording. The camera UI expands the preview and adjusts the bottom controls when entering Video or Cinematic so the recording frame is clear.
Photo aspect ratio controls are disabled in Video and Cinematic mode. Use Photo mode aspect ratios for still-photo crops; use Video mode settings for resolution, frame rate, codec, bitrate, stabilization, and color profile.
7.11 Filters In Video
Creative filters can be previewed live in Video mode and applied to recorded output. When a filter is active, Lumen Camera may disable video stabilization to reduce latency and avoid a laggy preview.
Long-press the viewfinder while a filter is active to compare filtered and unfiltered preview where supported.
9.12 Tools Panel
The Tools panel groups Lumen Camera's live visualization aids:
Histogram: Luma/RGB exposure distribution.
Focus Peaking: Manual-focus edge highlight.
Focus Loupe: Magnified focusing aid.
Zebras: Highlight exposure warning stripes.
Availability depends on mode:
Auto Photo / Auto Video: Histogram and Zebras are available.
Semi-Manual / Manual: Histogram, Focus Peaking, Focus Loupe, and Zebras are available.
Portrait: Tools are hidden because the depth-blurred preview does not reflect the final exposure surface reliably enough for zebras and other overlays.
Cinematic: Histogram and Zebras are available; Focus Peaking and Loupe are disabled because Cinematic uses its own focus-tracking system.
Unavailable tools remain discoverable in the panel and show an explanatory toast if tapped.
9.13 Focus Peaking
Focus Peaking highlights high-contrast edges so you can see what is sharp. It is GPU-accelerated and designed for manual focusing.
Peaking is available from the Tools panel in Semi-Manual and Manual modes. It can also affect video stabilization because low-latency tools require a responsive preview.
Focus Peak color can be changed from Settings -> Focus & Exposure Tools -> Focus Peak. Available colors are Yellow, White, Red, and Green. Green is the default.
9.14 Focus Loupe
Focus Loupe provides a magnified circular view for critical manual focus.
Loupe modes include:
Off: Hidden.
Auto: Appears during focus adjustment.
On: Remains visible.
The loupe can include a center crosshair and can be repositioned on the viewfinder.
9.15 Histogram
The histogram helps evaluate brightness and color distribution.
Histogram options include:
Off
Luma
RGB
Continuous / digital curve style
Discrete / analog bar style
Tap the histogram overlay or use the Tools panel to cycle through display modes.
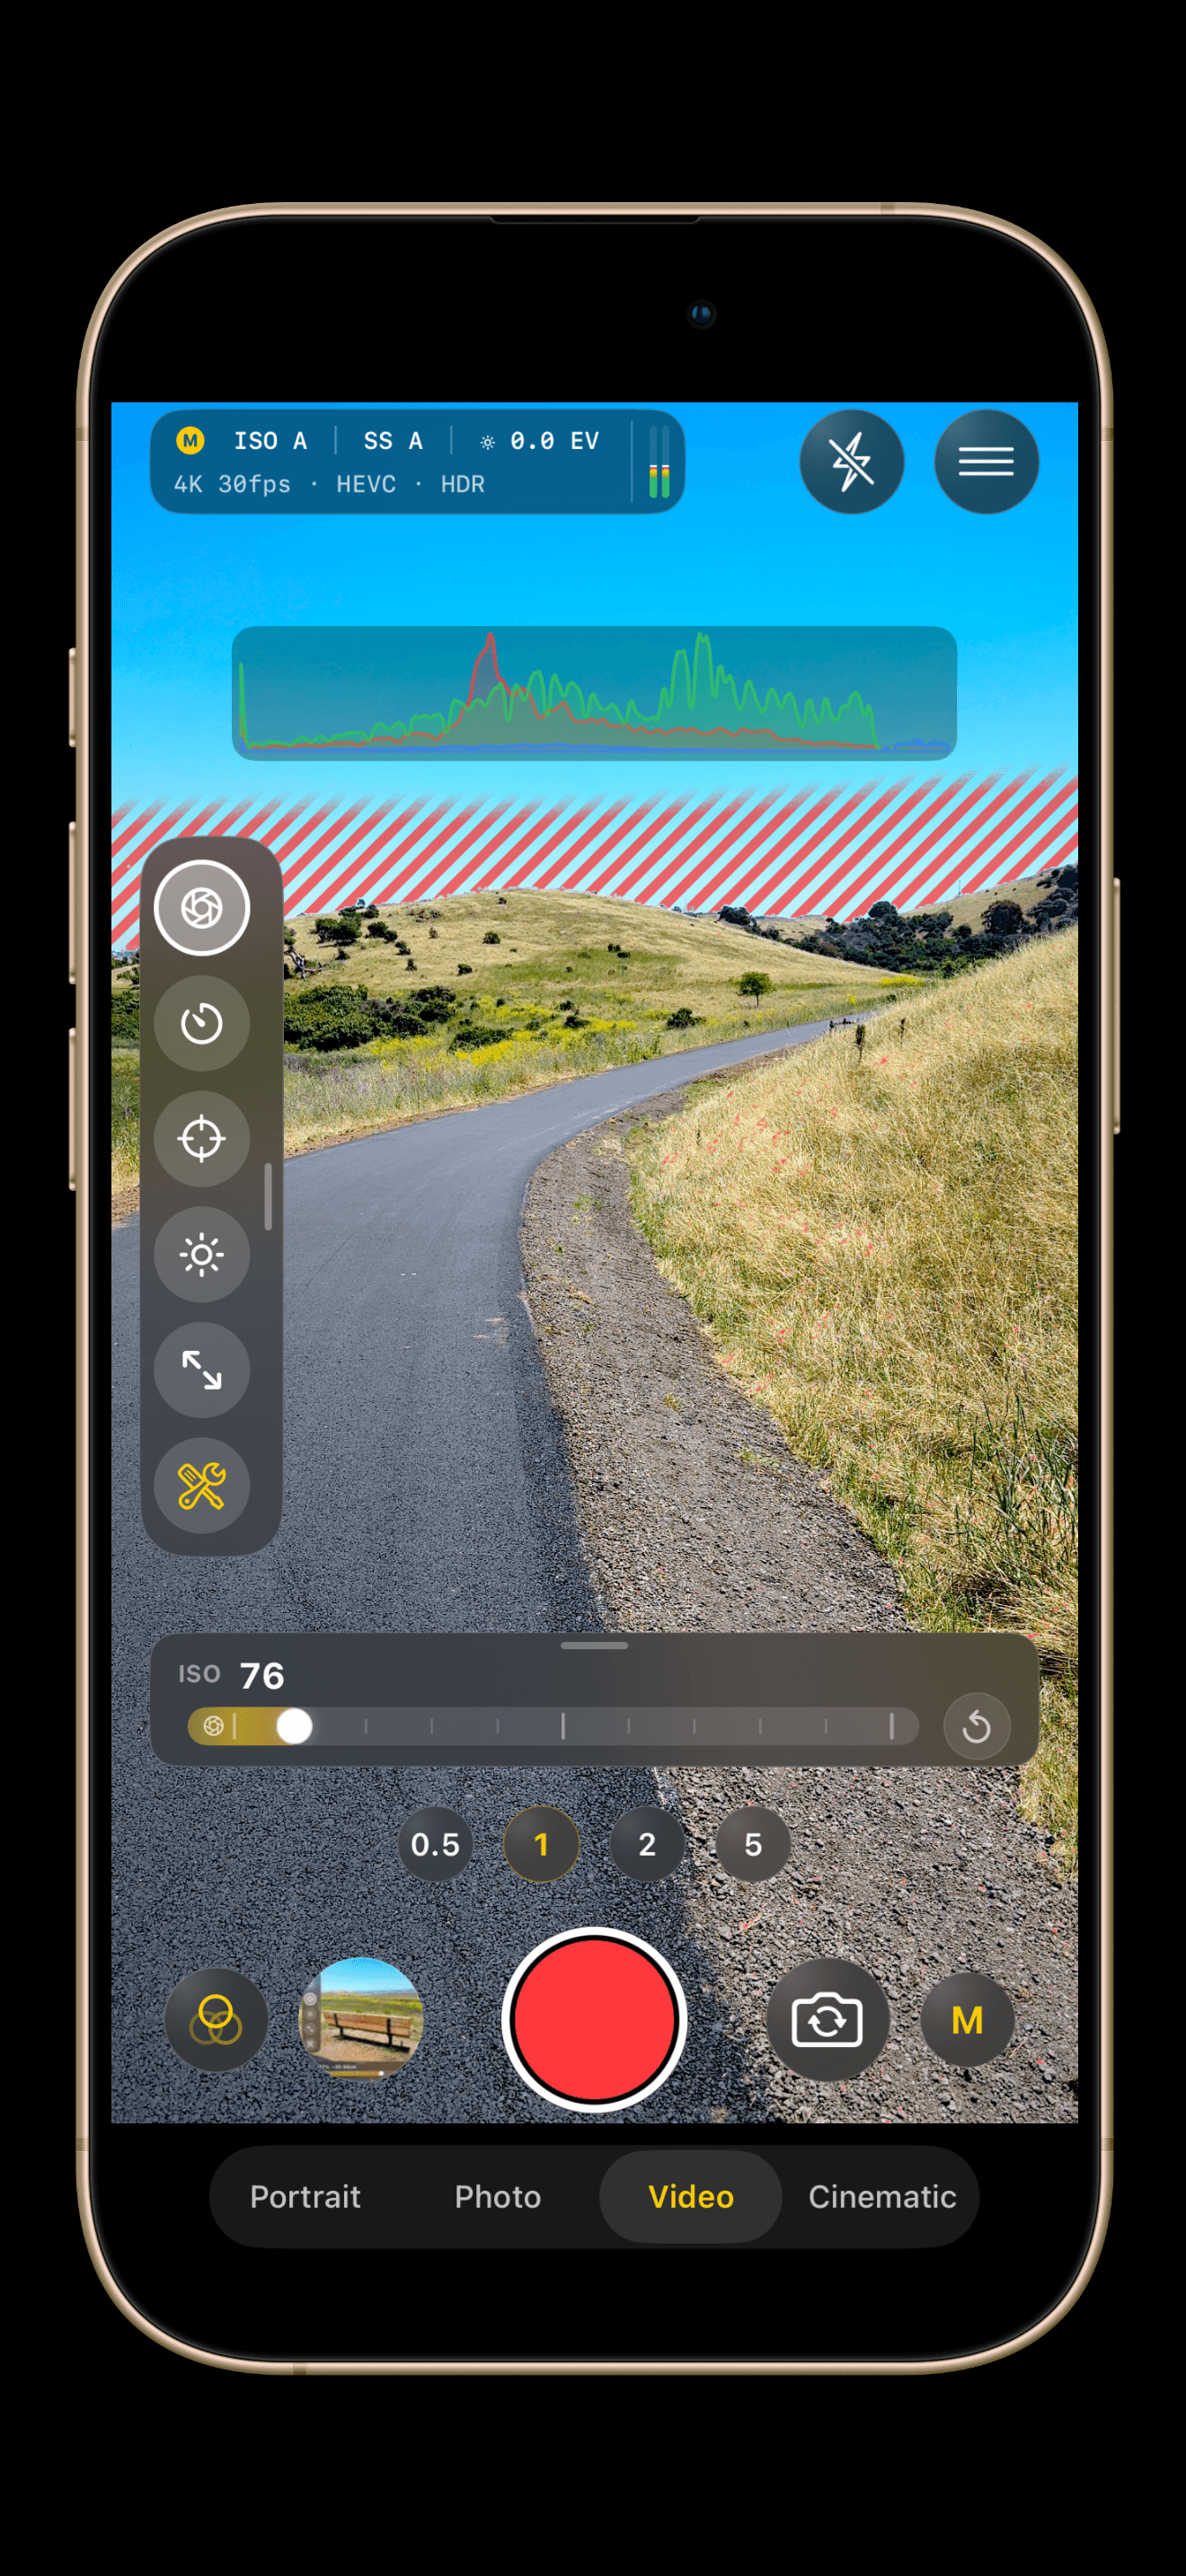
9.16 Zebras
Zebras are an exposure-warning overlay. When enabled, Lumen Camera draws animated diagonal stripes over bright regions that meet or exceed the selected luma threshold. This helps you spot highlights that are close to clipping before you capture.
Open Tools -> Zebras to choose:
Off: Disable Zebras.
80% Highlights: Show stripes on bright but still safer highlight regions.
90% Bright: Warn on hotter highlights.
95% Hot: Warn near clipping. This is the default threshold.
100% Clipped: Show stripes only on fully clipped highlights.
Zebras are available from the Tools panel in Auto, Semi-Manual, Manual, Video, and Cinematic contexts where the live preview represents the capture exposure. They are hidden in Portrait mode because the depth-blurred preview path can be misleading for exposure-warning overlays.
Zebra style can be changed from Settings -> Focus & Exposure Tools -> Zebras. Available stripe colors are Yellow, White, Red, and Green. Red is the default. If Reduce Motion is enabled in iOS accessibility settings, zebra stripe animation is disabled.
During video recording, Lumen Camera throttles zebra processing so the recording pipeline keeps priority.